Hinweis :
Weil die STM32F746 CPU noch nicht von Coocox unterstützt wird,
habe ich mich für die kostenlose OpenSTM32-Workbench entschieden.
Diese benutzt als Editor „Eclipse“ und „ARM-GCC“ als Compiler
damit können auch alle anderen STM32 CPUs programmiert werden.
Die Installation der Toolchain für den STM32F746 gliedert sich in 6 Teile :
1. Check ob JAVA in der Server-Version installiert ist
2. Download und Installation vom OpenSTM32-Packet
3. STM32F746-Discovery per USB anschließen
4. Demo-Projekt erstellen
5. Debugger starten
6. Release starten
Hier die Schritte im einzelnen :
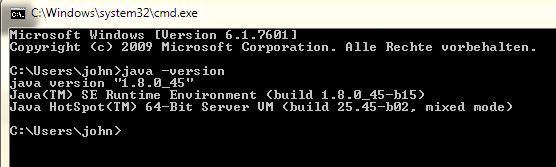
1. Check ob JAVA in der Server-Version installiert ist :
Eclipse benötigt JAVA (in der Server Variante).
Zum test kann in der Kommandozeile der Befehl
“java -version” eingegeben werden.
Das muss dann so aussehen :
Falls nur der Client installiert ist, unter “www.JAVA.com” die neueste
Server-Version runterladen.
2. Download und Installation vom OpenSTM32-Packet :
Im Netz unter “www.openstm32.org” anmelden und das “komplett Packet”
der IDE runterladen. Da ist Eclipse dabei und alle anderen notwendigen Files.
Die installation in einem “kurzen Ordner-Namen” vornehmen ohne Leerzeichen
z.B. “c:\ac6\”
Nach dem ersten mal starten ein Workspace Verzeichniss für die Projekte anlegen
und die updates runterladen, die gefunden werden.
Es kann auch gleich eine kleine Einstellung vorgenommen werden und zwar unter
“Window/Preferences” im TAB “General/Workspace”
Die checkbox “save automatically befor build” aktivieren.
3. STM32F746-Discovery per USB anschließen :
Nach dem anschließen vom Board per USB muss der STLink/V2-1 erkannt
und im Gerätemanager angezeigt werden.
![]()
Ein virtueller Com-Port sollte auch angezeigt werden.
1. Eclipse starten und per “File/New/C Project” ein neues Projekt erstellen.
Als Name z.B. “Blinky” , als Projekt-Typ “Executable/AC6 STM32 MCU GCC” auswählen :

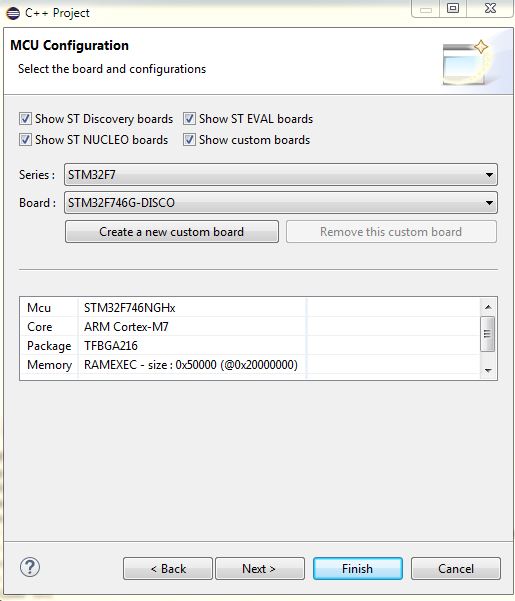
2. Bei der Configuration reicht eine “Debug” (Release kann abgewählt werden)
und bei der MCU muss das “STM32F746-Disco” gewählt werden :
3. Bei der Projekt-Struktur würde ich die Cube-HAL von ST
mit benutzen und die LoLevel-Treiber statisch zum Projekt hinzufügen :

4. Das “Main.c” liegt im “src” Ordner und zum test kann
das noch leere Projekt per “Project/Build Project” probeweise compiliert werden
das muss ohne Fehler funktionieren.
(Beim erstenmal dauert das etwas, weil er alle HAL-Libs compiliert)
5. Für das LED-Blinky kann das Main.c jetzt abgeändert werden :
(bitte diesen Downloadlink verwenden)

STM32F746 Toolchain und erstes Projekt Main.c Datei (gezippt).
1 2 3 4 5 6 7 8 9 10 11 12 13 14 15 16 17 18 19 20 21 22 23 24 25 26 27 28 29 30 31 32 33 | #include "stm32f7xx.h" #include "stm32f7xx_hal.h" void MX_GPIO_Init(void); int main(void) { HAL_Init(); MX_GPIO_Init(); while(1) { HAL_GPIO_TogglePin(GPIOI, GPIO_PIN_1); HAL_Delay(100); } } void MX_GPIO_Init(void) { GPIO_InitTypeDef GPIO_InitStruct; /* GPIO Ports Clock Enable */ __GPIOI_CLK_ENABLE(); /*Configure GPIO pin : PI1 */ GPIO_InitStruct.Pin = GPIO_PIN_1; GPIO_InitStruct.Mode = GPIO_MODE_OUTPUT_PP; GPIO_InitStruct.Pull = GPIO_NOPULL; GPIO_InitStruct.Speed = GPIO_SPEED_LOW; HAL_GPIO_Init(GPIOI, &GPIO_InitStruct); } |
und nochmal compilieren.
Um das compilierte File per Debugger auf dem STM-Board zu starten,
“Run/Debug as/Ac6 STM32 Application” aufrufen und in die
Debug ansicht wechseln.
Der “Play”-Button startet den Debugger, der “Stop”-Button beendet ihn.
Nach einer Änderung im Sourcecode kann das Programm auch per
“Run/Run” direkt compiliert und ohne Debugger gestartet werden.
7. Fertig :
So, ich hoffe ich habe in der Doku nichts vergessen oder falsch beschrieben
falls doch dann hinterlasst einen Kommentar.
15 Antworten auf STM32F746 Toolchain und erstes Projekt
Wie hat Dir dieser Artikel gefallen?
 (Noch keine Bewertungen)
Hallo Uwe!
Gibt es die Java Server Version nur für Windows 64Bit?
nein, es gibt auch eine 32bit Version…unter der Internetseite bei :
“siehe alle Java Downloads” http://java.com/de/download/manual.jsp
I have a few errors:
1. Eclipse not see HAL libraries and marks errors by function,
2. When I click ‘Project-> Build Project’ – shows an error when compiling “arm-eabi-gcc bad start (like not found or close becouse error) (Error 0×000142)
I work on Win 8.1 and I’ve CoIDE on this same machine.
Any ideas?
do you install the proper version from openstm32 ?
in my case it works out of the box. there is a new version 1.3.0
that automaticly downloads HAL-LIB 1.1.0
Yes, I installed – (Latest Windows 7 64 bit installer (Version v1.3, updated on Friday, July 24, 2015 at 12:44:45 CEST)
But I’ve win 8.1, maybe it’s problem.
HAL-LIB 1.1.0 are downloaded automatically.
Next I past Your first example (from Your Toolchain instruction – Blinky) and I see underlined error like Eclipse not see library.
Last I try compiled project without Your example (I’ve clean projekt with blank main() function) and during building compilation Eclipse reports error “arm-eabi-gcc – the application failed to initialize properly (Error 0×000142)”
Now I don’t know where is problem, tomorrow I try installed OpenSTM32 on other computer (where never installed coocox, eclipse, coreutils, arm-eabi and with WIN 7) and perhaps I find the cause, I’ll let You know if I find solution.
a installation path with whitspaces also causes a problem.
i used “ac6″ in the root of a drive.
I installed AC6 and arm-none-eabi-gcc whitout whitespace
(C:\Ac6\SystemWorkbench| C:\GNU_Tools_ARM Embedded\4.9_2015q2\bin)
and Eclipse not see HAL library. Workspace I’ve here – C:\Ac6\workspace
but OK, first I want compiled clean main() function.
Always when Eclise try “invoking commands make all” I get something that in consol in eclipse:
“11:58:30 **** Build of configuration Debug for project Blinky ****
make all
Building file: ../startup/startup_stm32f746xx.S
Invoking: MCU GCC Compiler
%cd%
arm-none-eabi-gcc -mcpu=cortex-m7 -mthumb -mfloat-abi=hard -mfpu=fpv5-sp-d16 -DSTM32F746G_DISCO -DSTM32F746NGHx -DSTM32F7 -DSTM32 -DDEBUG -DUSE_HAL_DRIVER -DSTM32F746xx -I”C:/Ac6/workspace/stm32f746g-disco_hal_lib” -I”C:/Ac6/workspace/Blinky/inc” -I”C:/Ac6/workspace/stm32f746g-disco_hal_lib/CMSIS/core” -I”C:/Ac6/workspace/stm32f746g-disco_hal_lib/CMSIS/device” -I”C:/Ac6/workspace/stm32f746g-disco_hal_lib/HAL_Driver/Inc/Legacy” -I”C:/Ac6/workspace/stm32f746g-disco_hal_lib/HAL_Driver/Inc” -I”C:/Ac6/workspace/stm32f746g-disco_hal_lib/Utilities/Components/ampire480272″ -I”C:/Ac6/workspace/stm32f746g-disco_hal_lib/Utilities/Components/ampire640480″ -I”C:/Ac6/workspace/stm32f746g-disco_hal_lib/Utilities/Components/Common” -I”C:/Ac6/workspace/stm32f746g-disco_hal_lib/Utilities/Components/exc7200″ -I”C:/Ac6/workspace/stm32f746g-disco_hal_lib/Utilities/Components/ft5336″ -I”C:/Ac6/workspace/stm32f746g-disco_hal_lib/Utilities/Components/mfxstm32l152″ -I”C:/Ac6/workspace/stm32f746g-disco_hal_lib/Utilities/Components/n25q128a” -I”C:/Ac6/workspace/stm32f746g-disco_hal_lib/Utilities/Components/n25q512a” -I”C:/Ac6/workspace/stm32f746g-disco_hal_lib/Utilities/Components/ov9655″ -I”C:/Ac6/workspace/stm32f746g-disco_hal_lib/Utilities/Components/rk043fn48h” -I”C:/Ac6/workspace/stm32f746g-disco_hal_lib/Utilities/Components/s5k5cag” -I”C:/Ac6/workspace/stm32f746g-disco_hal_lib/Utilities/Components/stmpe811″ -I”C:/Ac6/workspace/stm32f746g-disco_hal_lib/Utilities/Components/ts3510″ -I”C:/Ac6/workspace/stm32f746g-disco_hal_lib/Utilities/Components/wm8994″ -I”C:/Ac6/workspace/stm32f746g-disco_hal_lib/Utilities/Fonts” -I”C:/Ac6/workspace/stm32f746g-disco_hal_lib/Utilities/Log” -I”C:/Ac6/workspace/stm32f746g-disco_hal_lib/Utilities” -I”C:/Ac6/workspace/stm32f746g-disco_hal_lib/Utilities/STM32746G-Discovery” -O0 -g3 -Wall -fmessage-length=0 -ffunction-sections -c -MMD -MP -MF”startup/startup_stm32f746xx.d” -MT”startup/startup_stm32f746xx.o” -o “startup/startup_stm32f746xx.o” “../startup/startup_stm32f746xx.S”
make: *** [startup/startup_stm32f746xx.o] Error -1073741502
11:58:33 Build Finished (took 3s.714ms)”
I solved the on of the problem:
I threw out coreutils from path in Eclipse Project. Eclipse cannot do make command becouse see make and cs-make and in folder is C:\…\Coreutils\bin\msys-1.0.dll and somewhere I read this file can do a problem with during compilation.
OK, but next If I past Your example – Eclipse don’t see HAL library.
Do You paste extra folder with HAL library to project or add path to HAL library folder in project proporities or eclipse preference?
OK, I solved all problems and compilation proceed without error now. I load file “Blinky.bin” do STM32F7 DISCO and LED (beside Reset Button) blinking.
So, as I promised:
1. Space in name of path can do problem (in my case, not),
2. If someone have installed Coreutils -> Uninstal it or delete path from Eclipse,
3. You’ve right, sometimes Eclipse have “Defekte Projekt-Settings” I found solution in Your site about BugReports,
Thank You So Much & Regards –
Tschüs, Peter
Hallo Uwe,
ich bin über die Fehlermeldungen der STM32-Workbench gestolpert, dass
1. Programme im Pfad nicht gefunden wurden (“Program “arm-none-eabi-g++” not found in PATH” und “Program “arm-none-eabi-gcc” not found in PATH”)
2. alle möglichen Typen nicht aufgelöst werden können (wie “Type ‘GPIO_PIN_1′ could not be resolved”), 12 Meldungen.
Bei der Suche nach den Ursachen ist folgender Link hilfreich: http://www.openstm32.org/forumthread949
Zitat:
“These are known bugs we are working on; currently the workarounds are quite simple:
– For the “arm-none-eabi-g++” not found errors, these only appear
while creating the project; if you just delete them from the Problems view.
– For the “could not be resolved” errors, this is due to the indexing not
done correctly (often due to th eprevious error); you just have
to right click on the project, then Index >> Rebuild and it should be OK then.
Hope this works for you,
Bernard “
Danke Für die Anleitung! Unter Punkt 4.3 musste ich “als sourcen hinzufügen” wählen ansonsten hat Eclipse die nicht eingebunden!? Dann einmal “Index => rebuild” ausführen und schon baut Eclipse alles brav.
Hallo,
ich hätte da generell mal die Frage, ob der Hardware Bastler vielleicht doch besser mit einem Raspberry Pi beraten wäre, als mit diesem “Controller”, dessen Leistung und Komplexität sich immer näher an der eines SoC für Smartphone oder PC bewegt? Ich gehe davon aus, dass dieses Dev Board ohne Libaries gar nicht zu nutzen ist und schwerpunktmässig für Grafik und Multimedia ausgelegt wurde? Oder lässt es sich auch für kleiner Steueraufgabe a la Arduino verwenden?
Gruss,
Christian
das sind alles subjektive Sachen. Manche mögen lieber den RPi in Phyton programmieren um eine LED blinken zu lassen andere nehmen einen Atmega8 in assembler und ich scheue mich auch nicht den F7 dazu zu nehmen. Was solls ? Und braucht man beim RPi keine Librarys ? (es heißt da halt nur anders). Ich denke jeder soll das nehmen zu was er gerade lust hat und sich nicht bei anderen wegen seine Entscheidung rechtfertigen müssen. Und ob sich der F7 bei einer Aufgabe langweilt oder nicht … who the fuck cares
Danke für die Hilfestellung! Die Fehlermeldung “arm-none-eabi-g++ not found in PATH” und “Program “arm-none-eabi-gcc” not found in PATH” verschwand nach einem update des Programms.
Einen Hinweis vermisse ich: Wie kann man den ursprünglichen Zustand wieder herstellen?
Antwort: STM32- Link Utility installieren, die Datei STM32746G-Disco…hex aufsuchen und den passenden External Loader auswählen.
Funktioniert bei euch eigentlich der Shortcut für Kommentare z.B. Cmd + / ??
Auch der Reset Button im Debugger ist bei mir ausgegraut, ist das bei euch ebenfalls so?